
February 16
11 min. to read
How To Resize An Image On iPhone: 3 Ways
Have you ever caught yourself asking, "Can I resize a photo on my iPhone?” Well, you're in luck because the answer is definitely yes! Knowing how to resize images is super useful for any iPhone user!
In this guide, we’ll dive into three expert methods to help you scale your photos just right: using the handy Photos app, exploring some robust third-party applications, and leveraging advanced AI technology with Luminar Neo. So grab your iPhone, and let’s get started on turning good photos into perfect ones with a few simple photo adjustments!
What It Means to Resize Images
 Think about a favorite photo that isn't quite the right size for what you need. Maybe it's too big to send in a quick message or too small to look good as your new profile picture. That's where resizing comes in handy.
Resizing lets you adjust the size of your image. You can make it larger, which we call upscaling, to fill space nicely on your website or ensure it doesn’t look blurry on a bigger screen. Or, you can make it smaller, known as downscaling, which is perfect when you need to save some space on your phone or speed up your website's loading time.
Although it's a bit different, cropping—cutting out parts of the image to shift the focus—is another way to resize. It helps you frame your photo exactly how you want it!
How to Resize an Image on iPhone with the Photos App
To resize photos using the iPhone’s Photos app, follow the next steps:
1. Start by opening the Photos app: Scroll through your library and pick the photo you need.
2. Tap on Edit: You'll find this in the top right corner of the screen. Hitting this button brings up the photo editing tools available within the app.
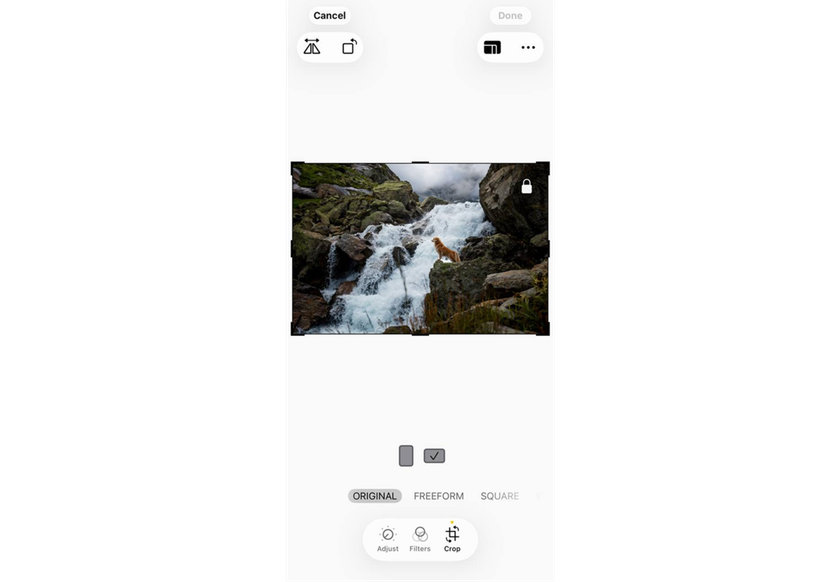
3. Look for the Crop tool: Down at the bottom of the screen, there’s an icon that looks like two intersecting right angles. Go ahead and tap it!
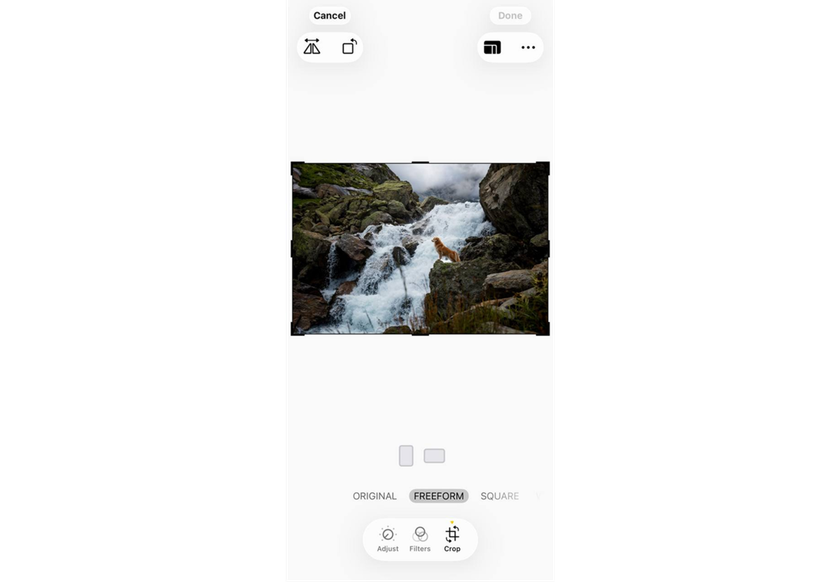
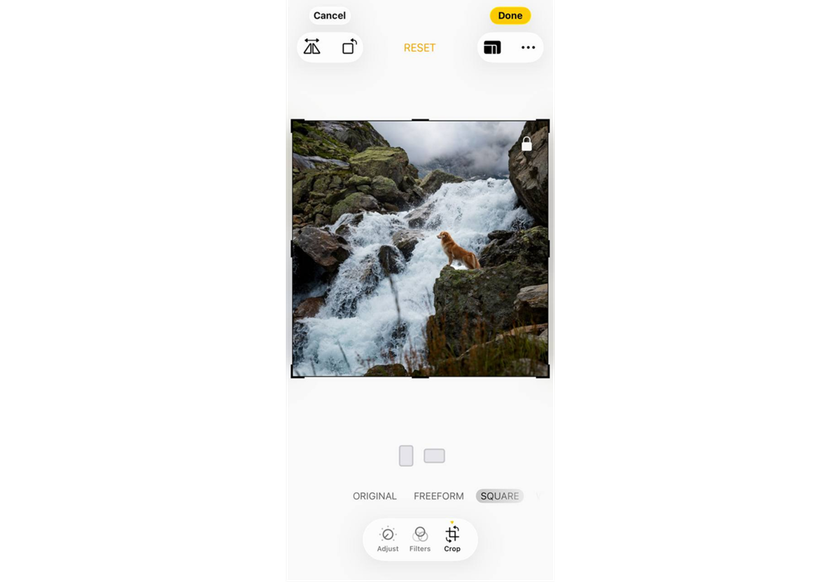
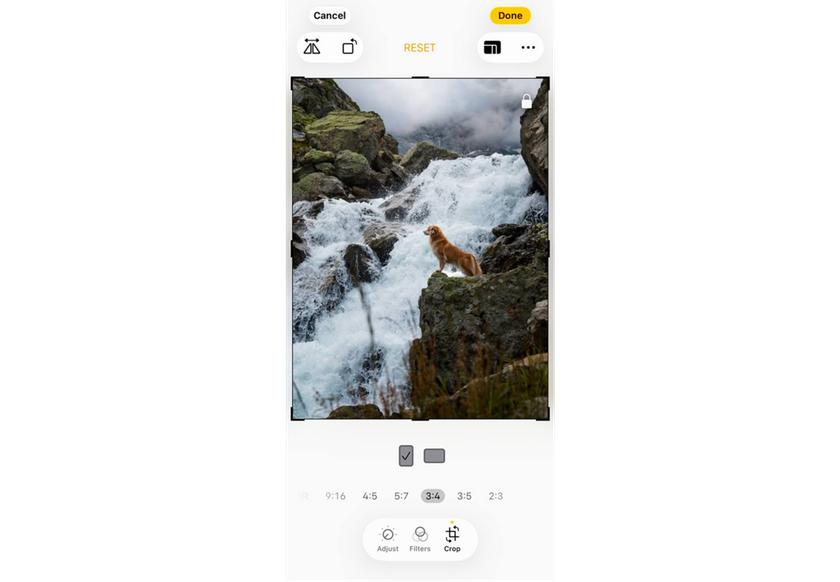
4. Explore resizing options: In the cropping mode, there’s a little icon in the top right corner that looks like a gray square. When you tap this, it will open a menu that lets you choose how you want to resize your image. Options there that you might use:
Original: It keeps your photo's original size.
Free form: This option lets you manually adjust the crop frame by dragging its corners or sides and gives you the freedom to make your image any size.
Square: It quickly crops your image to a square, trimming the edges to fit.
Preset Ratios: This is handy for specific sizes like 16:9 for widescreens or 4:3 for standard screens.


5. Finalize your adjustments: Once you select your resizing option, you can move and drag the crop frame around your photo until it’s just right. When you like the result, tap “Done” to save the resized image.
How to Change Photo Size on iPhone with a Third-Party App
While the Photos app is great for basic resizing through cropping, it doesn’t let you alter the resolution of your image. For more detailed size and resolution adjustments, you might need to check out some third-party apps that offer more advanced features. Here are three options that can help you resize your images with precision and ease:
1. Luminar Mobile
 Luminar Mobile is a cutting-edge photo editing app powered by AI. It allows users to effortlessly trim, align, flip, and rotate photos, perfecting composition directly from their phones. With advanced features like Sky AI, Skin AI, and Relight AI, combined with essential editing tools, Luminar Mobile is a top choice for photo editing on the go.
2. Fotor
 Fotor is a versatile photo editing app. It excels at resizing images, providing a seamless experience across both mobile and desktop platforms. The app allows for detailed resizing settings and supports batch processing, making it ideal for adjusting multiple images at once. As a simpler alternative to Photoshop, Fotor also includes tools for background removal and image cropping.
3. Pixlr (iOS and Android)
 Pixlr provides a comprehensive range of editing tools, including a dependable image resizing feature. It's ideal if you need advanced photo editing capabilities along with resizing options. You can manually set specific dimensions or choose from preset aspect ratios. Pixlr also offers batch resizing, saving time when processing multiple images. However, users may occasionally encounter bugs with the app.
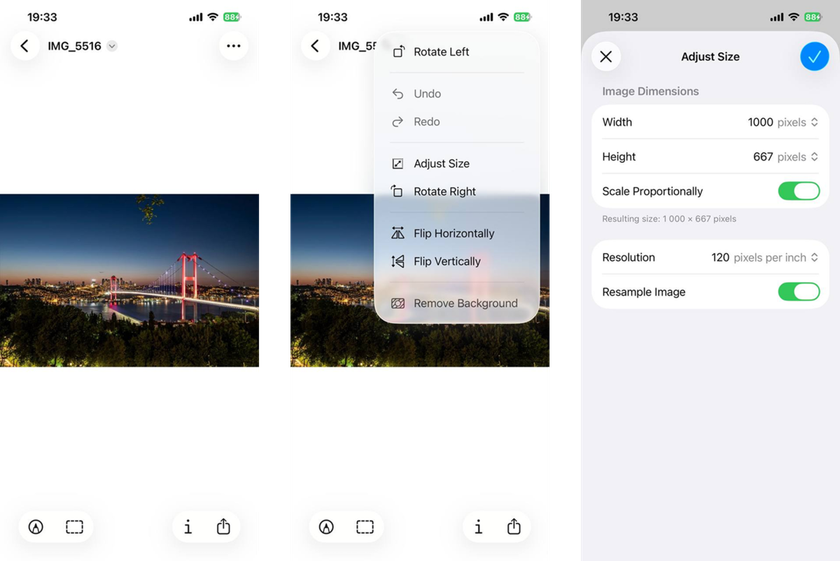
How to Resize with AI Software
If you are aiming for professional editing that includes features not found in simpler editors, try Luminar Neo! It is a professional AI photo editor, streamlines resizing images while maintaining their quality, perfect for various needs like printing, social media, or simply managing storage. The program is available for macOS & Windows users!
Options for Resizing in Luminar Neo
Use the Crop AI Tool
Open your image, select the Crop AI tool, and pick an aspect ratio to adjust your image dimensions quickly. It takes just a few clicks to get your desired result!
Resize on Export
For specific pixel dimensions, adjust the size during the export process, where Luminar Neo ensures optimal quality! You can follow these straightforward steps:
1. Open an Image: Start by opening the image you want to resize within Luminar Neo.
2. Navigate to Export Options: Go to 'Share to' and then select 'Disk' to access the export settings where you can resize your image.
3. Choose a Resizing Option: You'll have several choices on how you want to resize your image:
Long Edge: Set the size of the longer edge of your image, and the shorter edge will automatically adjust to keep the aspect ratio.
Short Edge: Set the size of the shorter edge, and the longer edge will adjust proportionally.
Dimensions: Directly input the measurements you want for both edges.

4. Adjust Export Settings (Optional): Customize additional settings to ensure your image is perfect for its intended use. Options include:
Color Profile: Choose from standard options like sRGB or Adobe RGB, depending on where you intend to display the image.
Format: Select the format of the exported image, such as JPEG or PNG.
Image Quality: Adjust the slider to your preferred quality level. Keep in mind that setting it below 50% might reduce the clarity of your image.
5. Save Your Image: Click 'Save' to export your resized image. You have the option to rename it or choose a new location to save, especially useful if you want to keep the original file unchanged.
Conclusion
So, we've explored several efficient methods on how to resize photos on your iPhone, addressing common needs even such as how to resize photos on iPhone without cropping tools! Now, you're well-equipped to tweak your images to perfection for any purpose. Each method brings its unique strengths and ensures you can keep your photos looking sharp and fitting perfectly wherever they're displayed.
And if you're hungry for more creative photo lifehacks, why not dive into our other posts? Check out "How to put 2 photos side by side on iPhone" for more fun and innovative ways to elevate your photography game!
 >
>
